
Editorial Content
Below is a series of video formats that I can offer, the videos can be recorded in the studio in london or on location.
OFF CAMERA INTERVIEW
Description: Essentially a talking head, only the answers are heard by the viewer (Green screen will require additional time)
Layout:


Format: Interviewer sits on RHS of camera, opposite subject
Interviewer should be as close to the camera as possible to keep a tight eyeline
Camera: You will only need 1 camera for this format but the format can be enhanced further with the use of two or more cameras.
Framing: Interviewee should be positioned using the camera/tripod so that camera is at the interviewee’s eyelevel. The interviewee should be positioned in the LHS of the frame. (See framing article for more information)
Example: Still-shot grabbed from interview
Please note that all information below is only a guide and should be adapted to suit individual circumstances.
Equipment:
1 x Camera
1 x Memory cards/tape
1 x Batteries
1 x Tripod
1 x Camera plate
1 x Handheld Microphone
1 x XLR
1 x Lights – Camera top light (for low light environments)
Interviewer notes:
Never talk over your interviewee, wait for a gap/quiet moment to interject
Try to retain good eye contact with the interviewee throughout the interview, this will help keep their eyes off the camera.
Agree with what they are saying but not vocally, simply nod and use facial expressions to agree.
Before you begin…
Tell the interviewee to look at you and not the camera, remind them to keep good eye contact with you and maybe suggest they look to your offside if they do need/want to look away.
Ask the interviewer to summarise your question at the beginning of their answer.
Example:
Q. What did you have for lunch today?
A. A Sandwich – Incorrect
A. For lunch today I had a sandwich - Correct
This means that in the editing phase of the production process, there is no need to hear the question asked by the interviewer, you should therefore be able to use each individual answer as a standalone statement. This is very useful in the editing phase.
Finally, once you have finished the interview, if you weren’t happy with any of the answers feel free to ask the interviewee if they wouldn’t mind answering them again, I would encourage you to tell them the kind of answer you had in mind if you think it could help.
Interviewee notes:
Try to relax and listen to the questions being asked
Wait until you have heard the full question before you begin your answer
Remember to summarise the interviewers question at the beginning of your answer
Try to avoid looking directly at the camera lens, instead try to retain good eye contact with the interviewer, if you need to look away look to the interviewers offside.
Once you have finished your interview, feel free to ask the interviewer to redo any answers you weren’t 100% happy with.
1 + 1 INTERVIEW (Studio)
Description: One host to interview one guest in the studio (in person or via the telephone)
Layout:


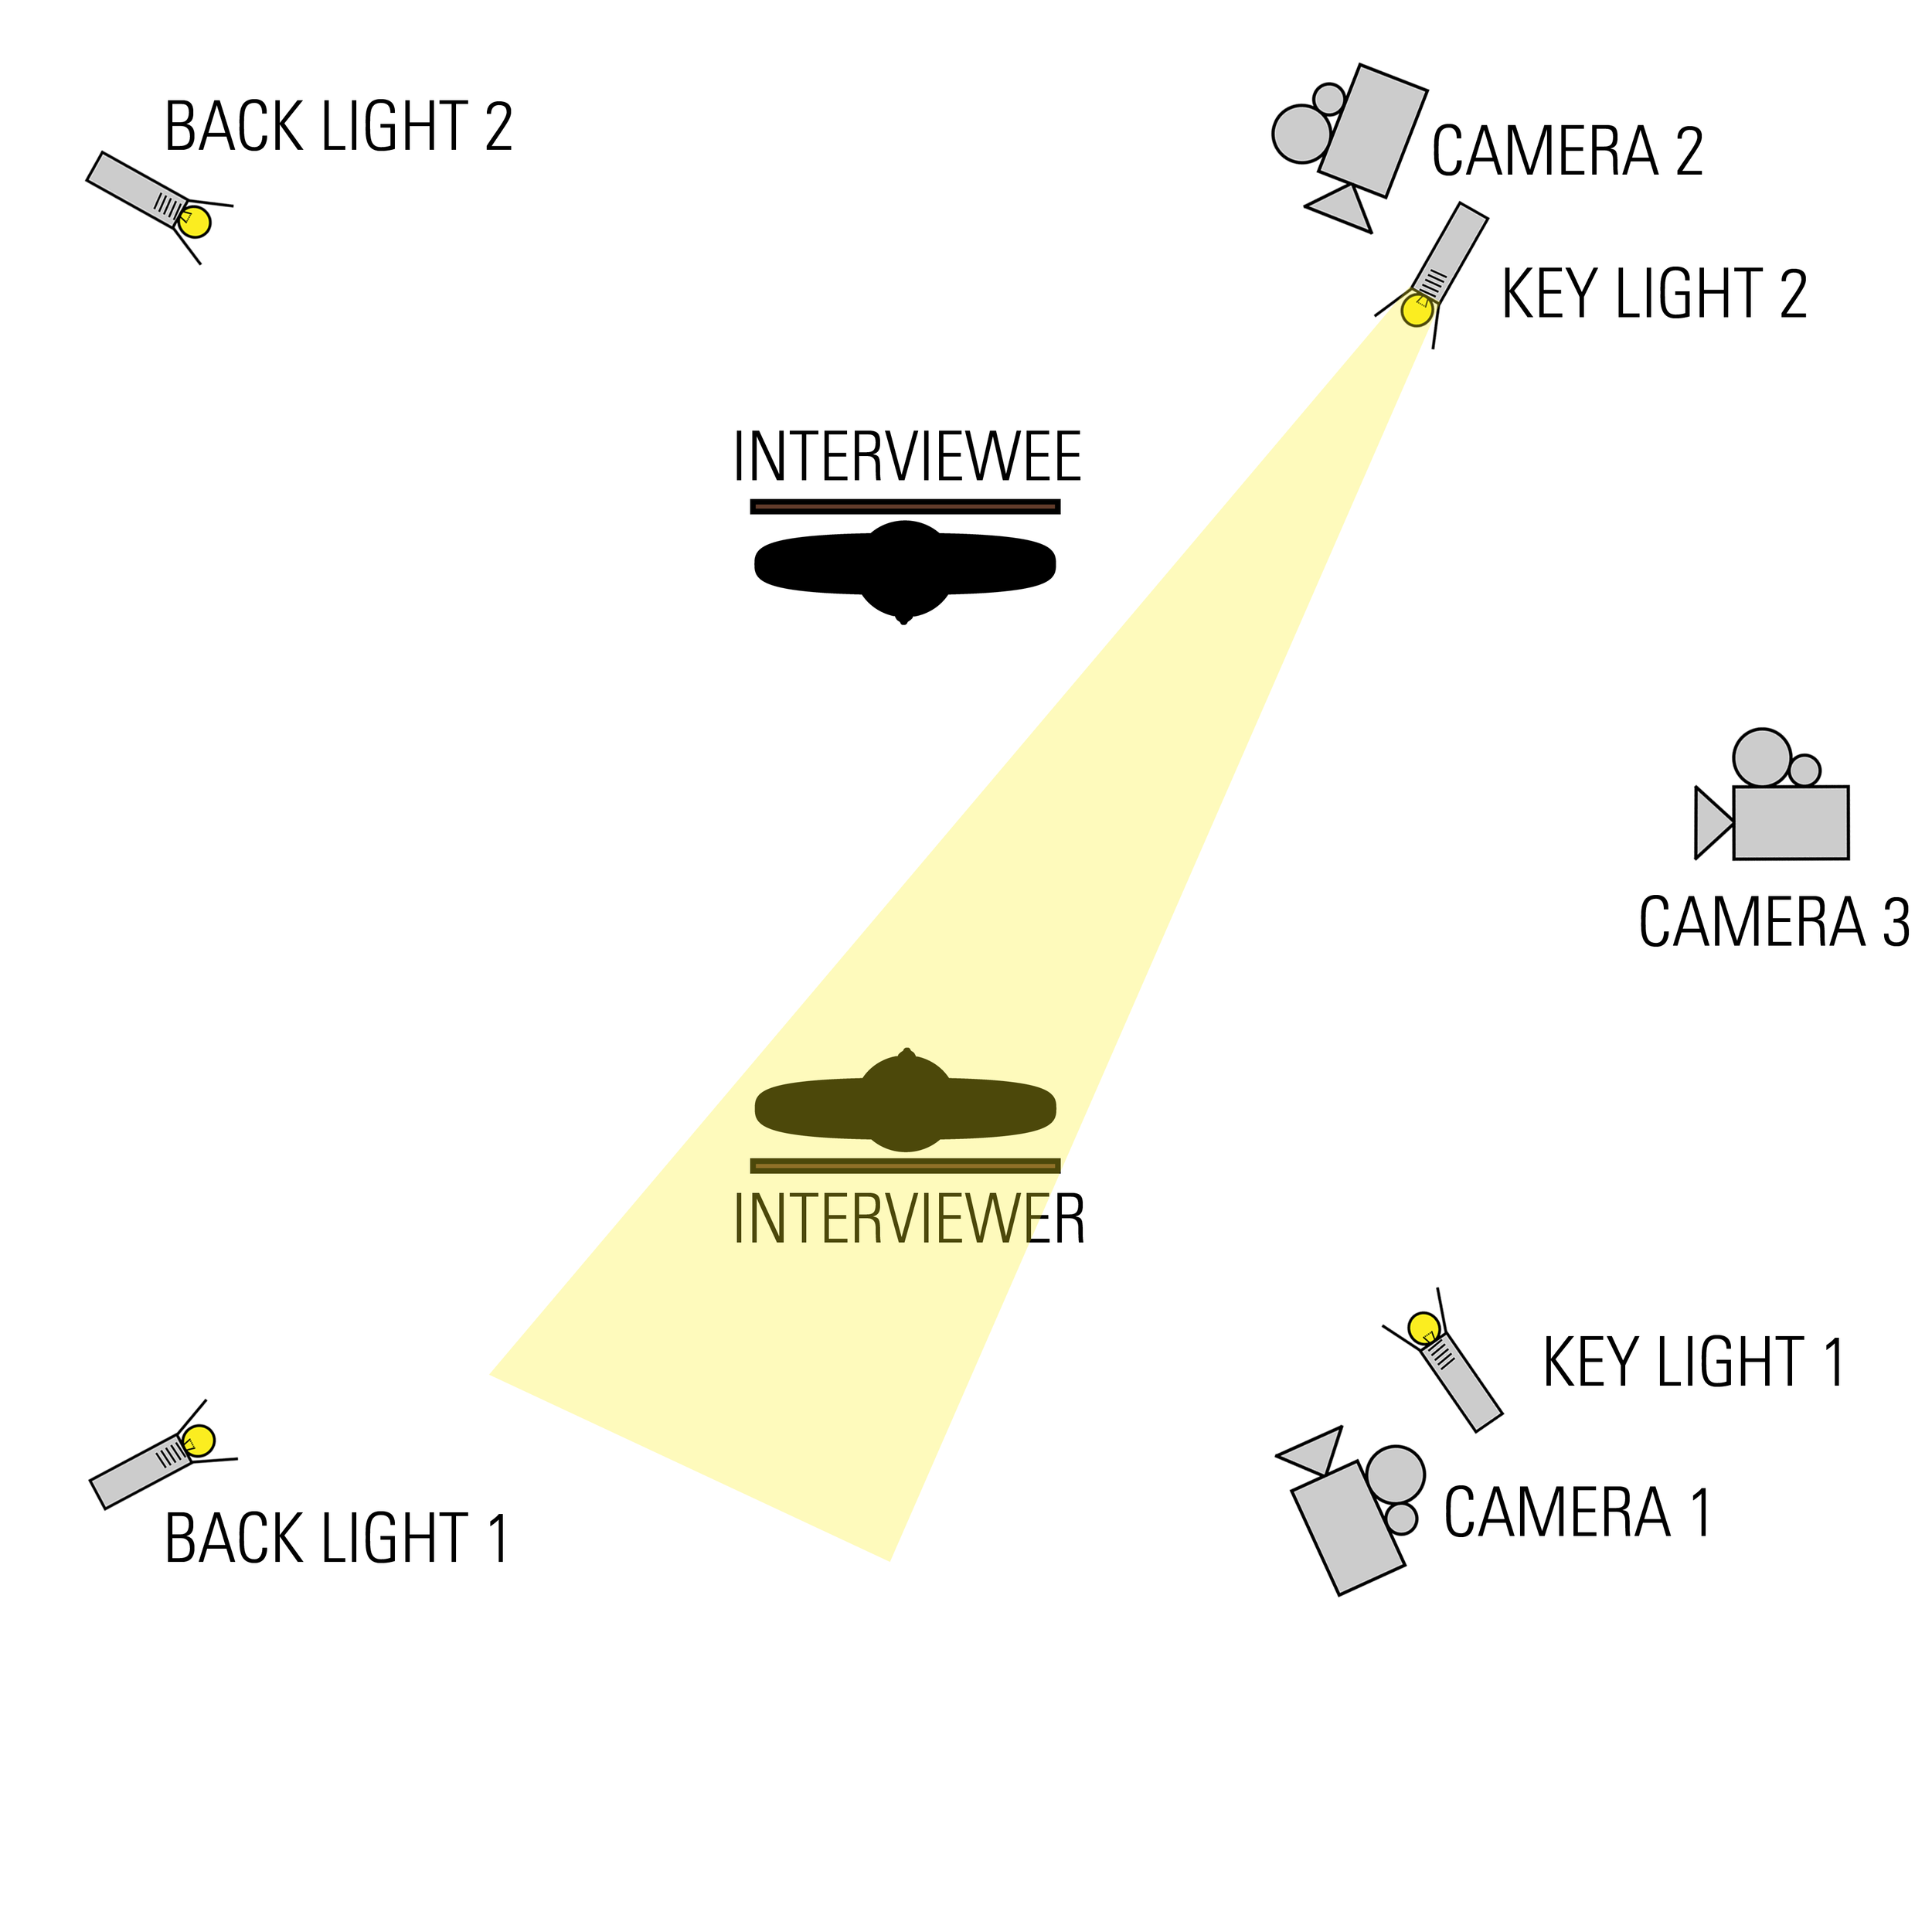


Format: Interviewer sits opposite Interviewee
Camera: This format works best with 3 cameras but the same look can still be achieved using less cameras more creatively
Framing: Cam1: Interviewer should be the LHS of frame
Cam2: Both Interviewer and Interviewee should be in shot
Cam3: Interviewee should be the RHS of frame
(See framing article for more information)
Cameras should be positioned using the tripod. Each camera needs to be at level level with the interview subjects.
Example:
Cam1:
Cam2:
Cam3:
Still-shot grabed from interview
Please note that all information below is only a guide and should be adapted slightly to suit individual circumstances.
Equipment:
3 x Camera
Memory cards/tape
Batteries
3 x Tripod
Camera plate
2 x Lavaliere Microphone
2 x XLR
4 x Lights
4 x Lightstands
4 x 4-way extension reels
Notes:
This format is the most normal for the interview subjects. It allows them to both have a very natural flowing conversation. They are allowed to interject and have debate just as you would in any normal conversation. Recording in this format also makes the footage very versatile during the editing phase.
Interviewer notes:
Conduct the interview without acknowledging the cameras at all. Just start with your first question and continued until all your questions have been answered. Once you get to the end of the interview thank your guest and rather than turning away immediately, continue to look at the quest for 5 seconds. This will help in the editing phase
I would suggest running the interview again if you are not completely happy with it. Generally people will give more concise answers on the second take.
Interviewee notes:
Simply listen to the questions and answer them how you see fit. If you need to retake any of the questions feel free to do so after the first run through.
Avoid looking at the cameras, instead try
to keep good eye contact with the host. Project your voice slightly and try to
look enthusiastic.
1 + 1 INTERVIEW (Location)
Description: One host to interview one guest on location
Layout:


Format: Interviewer sits opposite Interviewee
Camera: This format works best with 3 cameras but the same look can still be achieved using less cameras more creatively
Framing: Cam1: Interviewer should be the LHS of frame
Cam2: Both Interviewer and Interviewee should be in shot
Cam3: Interviewee should be the RHS of frame
(See framing article for more information)
Cameras should be positioned using the tripod. Each camera needs to be at level level with the interview subjects.
Example: Cam1:
Cam2:
Cam3:
Still-shot grabed from interview
On-location: As this is an on location shoot there are various things to be away of versus the studio environment.
Permission – Make sure that you have the relevant permission to film in your chosen location
Noise – Make sure that the location you are filming in has little or no background noise.
Lighting - Unlike the studio you will not necessarily have control over the lights so bare this in mind while selection your filming location. The best environment is somewhere where you have complete control over the lights.
Disruption - It is much more likely to encounter disruption when filming on location so bare this in mind when selecting a filming location.
Please note that all information below is only a guide and should be adapted slightly to suit individual circumstances.
Equipment:
3 x Camera
Memory cards/tape
Batteries
3 x Tripod
Camera plate
2 x Lavaliere Microphone
2 x XLR
4 x Lights
4 x Lightstands
4 x 4-way extension reels
Notes:
This format is the most normal for the interview subjects. It allows them to both have a very natural flowing conversation. They are allowed to interject and have debate just as you would in any normal conversation. Recording in this format also makes the footage very versatile during the editing phase.
Interviewer notes:
Conduct the interview without acknowledging the cameras at all. Just start with your first question and continued until all your questions have been answered. Once you get to the end of the interview thank your guest and rather than turning away immediately, continue to look at the quest for 5 seconds. This will help in the editing phase
I would suggest running the interview again if you are not completely happy with it. Generally people will give more concise answers on the second take.
Interviewee notes:
Simply listen to the questions and answer them how you see fit. If you need to retake any of the questions feel free to do so after the first run through.
Avoid looking at the cameras, instead try to keep good eye contact with the host. Project your voice slightly and try to look enthusiastic.
1 + 2 INTERVIEW (Studio)
Description: One host interviewing two guests in the studio (in person or one guest can be interviewed via the telephone)
Layout:


Format: Interviewer sits opposite Interviewee’s
Camera: This format works best with 3 cameras but the same look can still be achieved using less cameras more creatively
Framing: Cam1: Interviewer should be the LHS of frame
Cam2: All interview participants should be in shot
Cam3: Interviewee’s should either both be in shot or a CU on whichever interviewee is speaking
(See framing article for more information)
Cameras should be positioned using the tripod. Each camera needs to be at eye-level with the interview subjects.
Example:
Cam1:
Cam2:
Cam3:
Still-shot grabed from interview
Please note that all information below is only a guide and should be adapted slightly to suit individual circumstances.
Equipment:
3 x Camera
Memory cards/tape
Batteries
3 x Tripod
Camera plate
2 x Lavaliere Microphone
2 x XLR
4 x Lights
4 x Lightstands
4 x 4-way extension reels
Notes:
This format is the most natural for the interview subjects. Having two interviewees will help the dynamics of the conversation and is likely to result in more of a debate than a traditional questions and answers style interview.
It allows them to both have a very natural flowing conversation. They are allowed to interject and have debate just as you would in any normal conversation. Recording in this format also makes the footage very versatile during the editing phase.
Interviewer notes:
Conduct the interview without acknowledging the cameras at all. Just start with your first question and continued until all your questions have been answered. Once you get to the end of the interview thank your guest and rather than turning away immediately, continue to look at the quest for 5 seconds. This will help in the editing phase
I would suggest running the interview again if you are not completely happy with it. Generally people will give more concise answers on the second take.
Interviewee’s notes:
Simply listen to the questions and answer them how you see fit. If you need to retake any of the questions feel free to do so after the first run through.
Avoid looking at the cameras, instead try to keep good eye contact with the host. Project your voice slightly and try to look enthusiastic.
*Even if you aren’t talking it’s important to still engage with the conversation, use eye-contact to follow the conversation rather than staring blankly into the space. As the format uses three cameras it is possible that you will be on camera for a reaction shot even if you aren’t talking.
1 + 2 INTERVIEW (Location)
Description: One host interviewing two guests on location
Layout:


Format: Interviewer sits opposite Interviewee’s
Camera: This format works best with 3 cameras but the same look can still be achieved using less cameras more creatively
Framing: Cam1: Interviewer should be the LHS of frame
Cam2: All interview participants should be in shot
Cam3: Interviewee’s should either both be in shot or a CU on whichever interviewee is speaking
(See framing article for more information)
Cameras should be positioned using the tripod. Each camera needs to be at eye-level with the interview subjects.
Example:
Cam1:
Cam2:
Cam3:
Still-shot grabed from interview
On-location: As this is an on location shoot there are various things to be away of versus the studio environment.
Permission – Make sure that you have the relevant permission to film in your chosen location
Noise – Make sure that the location you are filming in has little or no background noise.
Lighting - Unlike the studio you will not necessarily have control over the lights so bare this in mind while selection your filming location. The best environment is somewhere where you have complete control over the lights.
Disruption - It is much more likely to encounter disruption when filming on location so bare this in mind when selecting a filming location.
Please note that all information below is only a guide and should be adapted slightly to suit individual circumstances.
Equipment:
3 x Camera
Memory cards/tape
Batteries
3 x Tripod
Camera plate
2 x Lavaliere Microphone
2 x XLR
4 x Lights
4 x Lightstands
4 x 4-way extension reels
Notes:
This format is the most normal for the interview subjects. It allows them to both have a very natural flowing conversation. They are allowed to interject and have debate just as you would in any normal conversation. Recording in this format also makes the footage very versatile during the editing phase.
Interviewer notes:
Conduct the interview without acknowledging the cameras at all. Just start with your first question and continued until all your questions have been answered. Once you get to the end of the interview thank your guest and rather than turning away immediately, continue to look at the quest for 5 seconds. This will help in the editing phase
I would suggest running the interview again if you are not completely happy with it. Generally people will give more concise answers on the second take.
Interviewee’s notes:
Simply listen to the questions and answer them how you see fit. If you need to retake any of the questions feel free to do so after the first run through.
Avoid looking at the cameras, instead try to keep good eye contact with the host. Project your voice slightly and try to look enthusiastic.
MOCK 2 x CAMERA INTERVIEW:
Description: The aim here is to record footage that can be edited together to give the impression of a sync'd two camera interview but only using one camera.
Layout:
Format: Interviewer sits on RHS of camera, opposite subject. This format is slightly more long winded to produce and should only really be used if time permits.
Rather than your usual setup of just recording the answers this format is designed to give the impression of a two camera interview but only using one camera.
Therefore you need to record the interview in stages, after each stge you should be completely happy with your footage before moving on to the next stage.
Stage 1 – Setup as if you were recording and off camera interview and record the whole interview with two mics but only focusing the camera on the interviewee.
Stage 2 – Flip the set so that the camera is now looking at the interviewer and record the intro, then each individual question. It is recommended that the interviewee provides a short answer in bullet points to each question rather than the full answer. This will help the interviewer seem more natural when asking the questions.
Stage 3 – Using this format make the editing more tricky so it’s always a good idea to record some “non-sync” cutaways to help in the editing process.
If shot and edited correctly it should give the impression that there were two cameras recording at the same time.
Camera: You will only need 1 camera for this format but the format can be enhanced further with the use of two or more cameras.
Framing: Interviewee and interviewee should be positioned using the camera/tripod so that camera is at the interviewee’s eyelevel. The interviewer should be positioned in the LHS of the frame (see framing article for more information) and the interviewee should be positioned on the RHS of the frame.
Example: Still-shot grabbed from interview
Please note that all information below is only a guide and should be adapted to suit individual circumstances.
Equipment:
1 x Camera
1 x Memory cards/tape
1 x Batteries
1 x Tripod
1 x Camera plate
2 x Lavalier Microphone
2 x XLR
3 x Lights
Interviewer notes:
Never talk over your interviewee, wait for a gap/quiet moment to interject
Try to retain good eye contact with the interviewee throughout the interview, this will help keep their eyes off the camera.
Agree with what they are saying but not vocally, simply nod and use facial expressions to agree.
Before you begin…
Tell the interviewee to look at you and not the camera, remind them to keep good eye contact with you and maybe suggest they look to your offside if they do need/want to look away.
As this is a “mock 2 x camera” setup then I would advise you to stick firmly to your questions. If you ask an adhoc question then forget to ask it again when filming the questions it will make the editing process much more difficult and in some circumstances impossible.
Example:
Q. What did you have for lunch today?
A. A Sandwich – Incorrect
A. For lunch today I had a sandwich - Correct
This means that in the editing phase of the production process, there is no need to hear the question asked by the interviewer, you should therefore be able to use each individual answer as a standalone statement. This is very useful in the editing phase.
Finally, once you have finished the interview, if you weren’t happy with any of the answers feel free to ask the interviewee if they wouldn’t mind answering them again, I would encourage you to tell them the kind of answer you had in mind if you think it could help.
Interviewee notes:
Try to relax and listen to the questions being asked
Wait until you have heard the full question before you begin your answer
Remember to summarise the interviewers question at the beginning of your answer
Try to avoid looking directly at the camera lens, instead try to retain good eye contact with the interviewer, if you need to look away look to the interviewers offside.
Once you have finished your interview, feel free to ask the interviewer to redo any answers you weren’t 100% happy with.